
Tags
CQG, piecing, quilting, raffle quilt, Single Irish Chain, tutorial
 If you haven’t already finished your Single Irish Chain block, these are the instructions for completing the block
1. As with the initial instructions for the four-patches, I encourage you to lay out your pieces in the way the block will end up: the solid white block in the middle; the four solid blue blocks at North, South, East, and West; and the four-patch blocks at the corners.
Pay particular attention to the four-patches because it’s easy to get them turned! One WHITE square should be on the actual corner of the block and the other white square should be at the corner of the center white square, as shown above.
You will, of course, note that you have an uneven number of blocks/units ,nine of them, so pairing them off to sew is not an option. I usually sew them in rows.
 2. Pair the first and second units in each row together, so four-patch to blue, blue to white, and four-patch to blue.
You will have one blue square and two of the four-patch units left to be sewn.
If you look closely at the photo, you can see I turned the bottom four-patch by mistake. This is a relatively easy mistake to fix since we’ve only just stated the 9-patch.
3. Sew these pairs together.
4. Open and press the seam towards the bigger blue (unsewn) squares.
 I usually cut the seam between the blocks, but people don’t saying it helps them line up the seams later. (I probably cut the seams because I’m always turning one of the units the wrong way no matter how careful I am. *sigh*)
5. Lay the block out again. With the units you left out at the second step.
Of course, there is where I can “correct” any units I have flipped.
 6. Pair up each two-block unit with one of the extras so you have three rows of three units.
Make sure the four patch units are reflections of each other! (You can only correct that mistake after this point by taking out the “offending” seam.)
7. Sew the units.
8. Press the seam towards the bigger solid blue block.
9. Lay your block out ago. You will have three strips of three blocks as shown.
10. Take the upper strip of three, and fold it down over 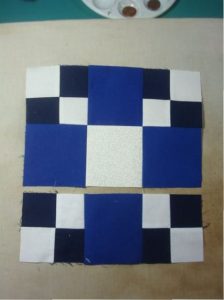 the middle strip.
If you always pressed the seams towards the bigger solid blue blocks, the seams will nest and you can easy butt the two seams of each unit.
11. Sew the seam.
12. Press open.
If you want and haven’t done so already, you can clip the extra bit of thread from between the seams (just the thread, not the material!) and press the long seam into three sections: towards the 4-patch, towards the solid white square, and towards the four patch. This will enable you to see a tiny four patch in the corner where the 4-patches and solid squares meet. (I always thought that was kind of cute, but I’m a sewing nerd…)
13. Flip the block 180 degrees, so you can fold the three-unit strip towards the 6-unit rectangular block, ready to sew the last seam.
14. Sew the last seam, the way you did in step 11.
15. Press the seam open the way you did in step 12.
You’re done.
Congratulations, you’ve completed the Single Irish Chain block! (I hope…)
If you have any questions or comments, please feel free to post them here or email me.
NOTE to my fellow Guild members: Although the picture of the Raffle Quilt mockup shows some of the blocks with yellow and white fabric, it’s a goof on my part. You should be making 9″ stars with only blues and whites, and the outermost blue should co-ordinate with the swatch we gave you (i.e. the blue of the Single Irish Chain blocks.)
The photos illustrating this tutorial were (mostly) taken before we cut the fabric for the quilt and therefore are a different color, especially in the four-patches. I picked a different blue for the four-patches so show contrast between the units.
I hope I haven’t confused you. I’ll be around if you have any questions! –a
